 |
flrig_help
2.0.04
|
 |
flrig_help
2.0.04
|
Submitted by Andy - VE3NVK / G8VTV

How to use the USB audio connection of the IC-7600 to a computer with FLDIGI and FLRIG.
Setting the IC7600 menu items
That should be it for the radio settings.
Now, on the computer, make sure that the sound card on the output side has some initial level set; try from 20 to 60% for starters.
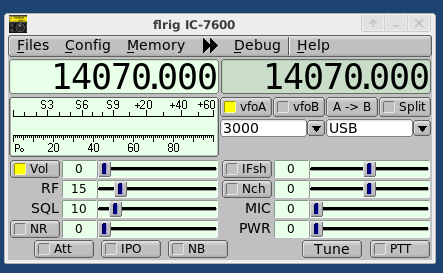
If using FLRIG, (the companion software) to FLDIGI, both of which I strongly recommend, set a level for microphone and power level (start at say 50%). I find that I ended up with the mic level very low at about 5%. If you are not using FLRIG in association with FLDIGI then you do have some other interface options, explained in the main FLDIGI on-line help.
Start both FLDIGI and FLRIG, make sure that FLDIGI is set to use XML-RPC for rig control, and not anything else. If you try to use rig control from both FLDIGI with FLRIG running then there will be conflicts, and who knows which programme will be in charge. FLDIGI sends frequency, mode and bandwidth changes to the transceiver via FLRIG when XML-RPC is selected. FLRIG in turn annunciates changes back to FLDIGI. The radio, FLRIG and FLDIGI should stay in synch no matter where the change occurs.
Make sure to press the INIT button before closing the window so that the settings you have changed TAKE.
When using digital modes make sure that (even for CW) that you have selected "USB-D1" for the audio connection. If you use anything else, you will NOT be able to transmit, just receive. (Unless you decided to set up for USB-D2 or D3). This shows in both FLRIG and FLDIGI.
The rig should then also show that it is set to USB-D1 with a blue background just above the frequency display and between the VFO and filter setting indicators.
If, as has happened to me with some of the iterations of FLRIG, the 7600 stops showing USB-D1, change it back by either pressing the USB button repeatedly on the 7600 until it shows, or in FLRIG if you can.
Finally using the TUNE button on FLDIGI, set up the power and modulation levels for almost no ALC action. You will have to play with both the MIC setting in FLRIG, and the output level setting for your sound mixer to get this right. You can work digital modes such as PSK31 very well with power levels of less than 25 watts output. Doing so does not stress your output finals too much and still gives you an effective signal out (unless your antenna system is awful.) At 25 watts output my rig shows about 13 amps for Ip.
When making these level selections make sure you press in and hold the rig's meter button for 1+ sec so that all the readings show at the same time.
Please note that the TUNE button on FLRIG does not work the same as the same as the tune button in FLDIGI. The tune button on FLRIG tells the 7600 to use its internal tuner to match to the antenna at the frequency selected. If you are already tuned then if will go on and off again very quickly with no time to adjust modulation level settings. The TUNE button on FLDIGI sends a continuous two tone signal at the maximum level, and is intended for setting the modulation levels - that is the one to use.
As I only use Linux on my rigs computer I have not been able to provide instructions for Windows users but they are essentially the same except as to how the serial port and audio ports are identified.
CAUTION
Last of all, always turn the 7600 on before starting FLRIG and FLDIGI, and always close the two programmes before turning off the 7600. If you do not do it in this fashion you may have to reset settings on starting up the programmes, and they will almost always hang on shutting down - at times necessitating a reboot in Windows.
Page Top