 |
flrig_help
2.0.04
|
|
flrig_help
2.0.04
|

The frequency display is also a control; it displays frequency in kHz. In addition to allowing you to set the rig frequency, it will track with changes made on the rig itself.
The number of digits that may be entered and the number of decimal digits displayed are determined by hard-coded data for the rig selected if using rig control. The intent is to match the actual rig display.
If you select NONE for rig control, 7 digits to the left of the decimal and 3 digits to the right are displayed.
In the rig control case, the maximum frequency is determined by the rig; in the NONE case, the maximum frequency is 9,999,999.999 kHz.
The maximum frequency based on the number of digits displayed is given in the tooltip. Note that this may be greater than the maximum frequency possible for your rig. If you attempt to set an unsupported frequency, the result depends on the rig.
You can set the frequency two ways without the control being in "focus" and several more ways with it in focus.
With or without Focus
With Focus
Shift-Left-Click (hold keyboard SHIFT button and press left mouse button) in the control to set focus. The foreground and background colors reverse to indicate the control has focus.

Each digit is sensitive to the mouse. Clicking the left or right button over the top half of a digit increments it while clicking over the lower half decrements it. Holding the mouse button down will cause the number to rapidly increase or decrease. In all cases the numbers "roll over" - i.e., you can change the digit you point to and all digits to the left of it. Be aware that if you have chosen to uncheck the Freq Top/Bottom left click box in the User Interface dialog that the incrementing/decrementing reverts to left click increments and right click decrements the digit under the mouse pointer.
Arrow and Page Up / Page Down Keys can be used to increment and decrement digits. Digits are numbered 0-9, right to left, with the digit's significance matching that of the rig's display. For example, if the rig's resolution is 1 Hz, D0's range is 0-9 Hz.
| Keys | Normal | SHIFT + key | CTRL + key |
|---|---|---|---|
All of the foregoing change techniques result in immediate changes to the frequency of a controlled rig.
There are two additional ways to set the frequency when the control has focus: PASTE from clipboard and direct keyboard entry.
You can paste from the clipboard (Ctrl/Meta-v) in addition to from the Selection buffer (middle mouse button). When pasting from a selection (highlighted number), the selection must be from text within the application whereas the clipboard paste will paste values copied from any application. The value pasted is expected to be numeric in units of kHz and can include a decimal point. If the value being pasted would exceed the maximum frequency allowed, the Paste action is silently ignored. Paste actions result in an immediate command to set the frequency on a controlled rig.
Lastly, you may enter a frequency directly from the number keys or keypad of a keyboard. Enter the frequency in kHz, including decimal point if there are non-zero decimal components, using either the number keys or the keypad. You may use any legal floating point format. For example:
When you press the first number, the decimal point in the display will blink to indicate you are in numeric entry mode. While in numeric entry mode, all other entry modes are disabled (i.e., no mouse clicks, rolls, or pastes are possible).
Continue to enter numbers, and optionally a decimal and more numbers. The value does NOT get sent to a controlled rig until you press the ENTER key. Pressing the ENTER key sends the value to the rig and exits the numeric entry mode.
If you want to make changes as you are entering numbers, you can use the backspace key to delete undesired numbers digit by digit, or Ctrl/Meta-Backspace to clear all digits on the side of the decimal point you are currently entering; use Ctrl/Meta-Backspace again to clear the left of decimal numbers as well if you have already entered a digit to the right of the decimal point, and then resume entering numbers.
If you attempt to enter more digits on either side of the decimal than there are digits available, the excess digit entries are ignored.
If you want to abort the process you can press the ESC (escape) key or click outside the control in a widget that will take focus (like a text field) or outside the application and the frequency will remain as it was; this exits numeric entry mode.
Vfo-A and Vfo-B are separate controls, A on the left, B on the right. If your radio has two VFOs, you can make one or the other active for transmission and reception by clicking on the corresponding button. Note that many radios allow you to change the frequency of an inactive VFO through remote command, in which case you do not have to click on the corresponding button to set its frequency.
Left click on the A/B button to swap several of the parameters of the VFOs (e.g., frequency, filter setting, mode) and change the active VFO to follow (so effectively your operation has not changed but you are using the other VFO).
Shift-click to copy just the frequency from Vfo-A to Vfo-B, and Ctrl-Click to copy in the other direction.
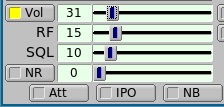
The buttons that have a light box are toggles - activated when the lighted box is colored. Some of these are linked to a slider. If the button state is inactive then that associated slider will be greyed out. In the example the volume control is active and the NR control is inactive.
PTT can be activated at FLRIG or using the T/R button on FLDIGI. FLDIGI also engages the PTT via the macro <TX> <RX> tags. When operating digital modes with FLDIGI you should use the PTT from FLDIGI.