Table of Contents
- Flamp Description
- Initial Configuration
- Transmit Procedure
- Transmit Mode Options
- Transmit Interval Time Warning
- Mode Synchronization: fldigi to/from flamp
- Receive Procedure
- Requesting Missing Blocks/Header
- Sending Missing Blocks/Header Information
- Text Files
- Transfer Receive Queue Item to the Transmit Queue.
- Event Scheduler
- Debug Log
- Repeaters

Flamp Description
Notice: This version of Flamp is not compatible with version 1.x.x
FLAMP is a program for AMP or Amateur Multicast Protocol. An flamp session willtransmit one or more files with one or more iterations of the transmission. Each file is broken into blocks, each of which has a check sum. The receiving station saves the blocks that pass check sum. Successive transmissions will fill in the missing blocks provided that the new blocks pass the check sum. After the transmission sequence, the entire file is assembled and may be saved. “Fills” may be provided by retransmitting the entire file or by the sending station only sending the missing blocks. Start by downloading the current version of flamp from w1hkj's website. Install the software as you would any of the NBEMS applications. You should also uninstall any older or development versions.
Initial Configuration
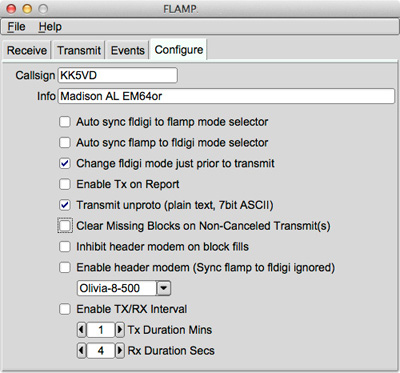
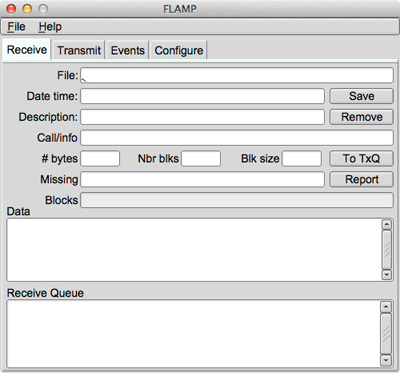
When you open flamp you will see a screen with four tabs, Receive, Transmit, Events and Configure. Click on the Configure tab and fill in your call sign and relevant information as shown. There are other options which will be covered later.
Transmit Procedure
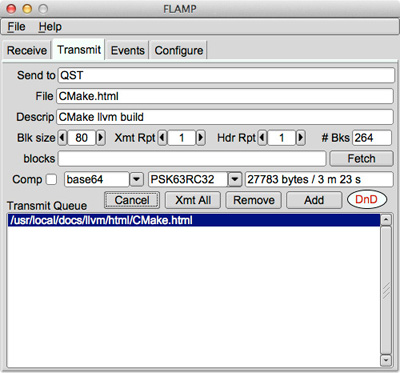
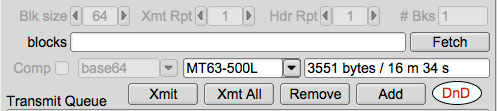
Flamp divides a message file into blocks, each of which will be checked for errors when received. You can select the block size with the Blk size selector. The range is from 16 to 2048.
Flamp will repeat the transmission from 1 to 10 times with an option of repeating the header data independently. Select the appropriate number based on transmission mode (i.e. mode performance) and propagation conditions.
File identification is derived from multiple sources of information. These include date and time of the last file modification, compression, base encoding, and block size. Therefore, additional transmission sequences may be performed if necessary as long as these settings are not changed. If these settings are modified, flamp will treat the file as a new transmit queue item.
On the "Send to" line you may add any specific recipients for the file. The default is “QST” (general call to all amateur radio operators) which may not be appropriate in some countries.
To send a file, it has to be added to the queue. Click Add and then browse for the file or you can drag and drop the file from your desktop to the DnD icon (one or more files). Flamp will handle any file format.
You have the option to compress the file with the Comp check box and select the level of encoding: base-64, base-128, or base-256. A warning dialog will be displayed if the compression is not selected and a file is added to the transmit queue that requires compression (images, all files with high bit set bytes, etc). Compression, base encoding, and description fields are a per file configurable item.
Note: In some circumstances depending on the contents of a file. Flamp will automatically enable compression. Disabling compression on these files(s) may have unintended effects between flamp and fldigi. It is strongly suggested that compression remain enabled in these cases. The blocks line and Fetch button will be discussed later. This is used for filling in missing blocks without a full repeat of the file transmission.
Flamp provides some additional information. When you select the compression/no compression option and the mode (in this case PSK63RC32), you will see the file size, number of blocks and estimated transmission time. This is useful for determining trade offs in terms of mode, repeats, compression and block size. Please note that the file size is the total transfer size (in bytes) and includes the AMP header overhead.
In the example figure, the 27.8KB CMake.html file will take 3 minutes and 23 seconds to send with the selected mode and parameters.
Note: When Tx/Rx Interval is enables transmit time does not include the time between transmit periods.
When the file has been added to the Transmit Queue, you may add a file description in the Descrip line. This could be just a basic description of the file or have handling instructions. If sending just one file, you must highlight the file in the queue and press the Xmit button to transmit. This will place the file name and description in the corresponding lines. If you have more than one file in the queue, you may transmit all of the files by clicking Xmt All. Highlighting is not necessary.
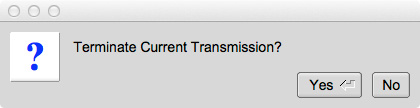
The file transfer can be terminated by selecting the cancel button. Once selecting cancel the user has the option to cancel or continue with the transfer termination by selecting "Yes" or "No" in the presented dialog box. Termination resets Fldigi internal buffers and returns to a RX state.
Transmit Mode Options
Located on the Configure panel.
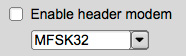
Enable Header Modem will allow the Critical Header data to be transmitted using slower more robust mode. The modem is user selectable. Fldigi's Tx/Rx RSID will be activated prior to transmission.

Inhibits header modem when block fills are being transmitted. Header modem use is resumed after the Fetch text field is cleared. If a "PREAMBLE" report is received this feature is ignored until after the block fill transmission is completed. At which time the internal flag is reset until another "PREAMBLE" report is received.
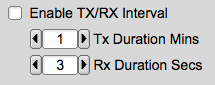
Enable TX/RX Interval time allows the segmentation of data to be transmitted at specific intervals. Used for transmitting data over repeater systems that incorporate limited/restricted transmit time frames. The actual transmit time maybe less then the selected time by 10-15% depending on the modem and block size used.

Enabling TX/RX Interval requires Change fldigi mode just prior to transmit activation. This ensure the transmit duration is correct for the FLAMP selected modem (software controlled). This feature is user controlled when Enable TX/RX interval is disabled.

Enabling Clear Missing Blocks on Transmit clears the Fetch text field of all missing blocks after a fill transmission has been conducted. Disabled leaves the Fetch text field unaltered.

Enable Transmit Unproto allows for the transmission of plain text without FLAMP control codes and checksum values. This mode restricts the data to 7 bit ASCII. Any file that contains control characters and/or binary (upper bit set) will be removed and the remaining 7 bit ASCII data will be transmitted. Flamp will not be able to receive this data as it lacks the necessary control information.
Enabling unproto disables (grayed out) some widgets in the Transmit panel.
If the unproto message contains embedded ARQ commands a character within the command will be substituded to prevent Fldigi from processing them. A notice will be appended to the transmitted message indicating the change.
NOTICE: Command Character Substitution!
<_md> <-> '_' = 'c'
Transmit Interval Time Warning
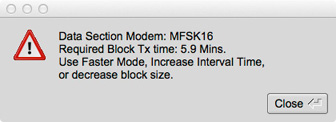
When using Transmit/Receive Interval option there is a possibility of a block segment transmit time will exceed the interval transmit time. If this condition occurs a warning dialog box will be displayed listing the options required to correct the condition. Flamp will not transmit until this condition is resolved.
Mode Synchronization: fldigi to/from flamp
Flamp and fldigi have the capability to synchronize modes, i.e. you only have to set the mode on one or the other and the second will follow. This feature may also be disabled so that the mode being used with fldigi at a given moment can be independent of the mode being used for flamp file transfers.
On the Configure screen note the three top options as shown. The first option auto syncs fldigi to the mode selected on flamp. The second syncs flamp to the mode selected on fldigi. These two options are not mutually exclusive: if the first two options are selected, the mode selection is bilateral.
The third option will override the current fldigi mode (e.g. a keyboard mode such as Olivia 8/500) with the mode selected with flamp for file transfers (e.g. one of the MT63 modes). The mode change will take place at the time of transmission.
If none of the boxes is checked, there will be no synchronization.
Before transmitting, an flamp-compatible version of fldigi must be running with the mode selected and frequency clear.
Receive Procedure
The receiving stations must have flamp open with fldigi running. Fldigi will not “wake up” flamp as it does with, for example, flmsg.
The receive operation is hands-off. As the blocks are received the file information is filled in (file name, date/time, etc.) and the successfully received blocks will be depicted as dark blue rectangles on the progress bar. The blocks are positional. That is, a missing block will simply be a white space where the block would be if received correctly. On subsequent receptions that block will fill in when received correctly. The percent complete on the respective line also shows the state of each file being received.
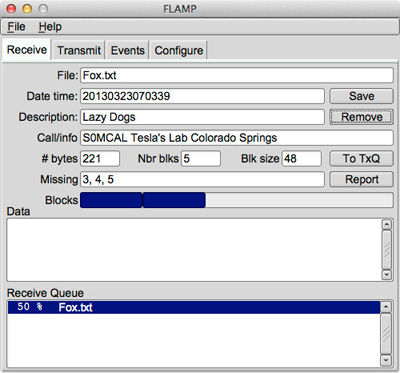
You will also see block numbers showing up in the Missing line. When the complete file is received, that line should be blank. Received text files will appear in complete form and readable in the Data panel.
To save a file, click Save with the file highlighted. This will place the file in the rx folder in the default directory:
| Operating System | Folder/Directory |
|---|---|
| Windows | C:\Documents & Settings\User\flamp |
| Linux | /home/user/.flamp |
| Macintosh | /Users/User_Login_Name/.flamp |
The received file size is the actual file size, i.e. the actual bytes being transported (per repeat) less all of the Amp header information.
The Send to information does not appear on the flamp screen. It will be seen in the fldigi RX panel as shown below:
Data segments encoded in base64.
N0BDY DE S0MCAL
<PROG 18 E9CE>{0EE2}FLAMP x.x.x
<FILE 28 13C7>{0EE2}20130323070339:Fox.txt
<ID 41 EEBC>{0EE2}S0MCAL Tesla's Lab Colorado Springs
<SIZE 14 2F49>{0EE2}221 5 48
<DESC 15 856E>{0EE2}Lazy Dogs
<DATA 56 B927>{0EE2:1}[b64:start]AUxaTUEAAAggXQAAAAQAEAxB/TEWllgk3J5mK
<DATA 56 BAFA>{0EE2:2}pYEOyC+U2nmNwaGCVvFVmqBX/av7rhbtp4H4xoY39GsVdk5W
<DATA 56 24A2>{0EE2:3}ZmH3Jm/CULrcdlB39rhWJUUCcE0jXPg1l3yWPIV2q4fQDgaz
<DATA 56 87D0>{0EE2:4}FXD/IqYKt7x07GamZsVFZORzk/TLgX4vBXqTc86KGO7kCFhJ
<DATA 37 8435>{0EE2:5}Wpmo3mbURumL0Xj8cIE[b64:end]
<CNTL 10 8E8D>{0EE2:EOF}
<CNTL 10 2E81>{0EE2:EOT}
N0BDY DE S0MCAL K
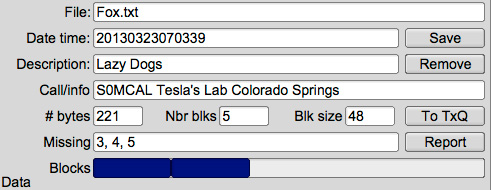
This image shows a partially completed file. Three blocks were missed in the first pass and they will (hopefully) be filled in during a repeated transmission.
Note that the blocks with errors show up in the Missing line. In this case, blocks 3, 4 and 5 were received with errors. The Receive Queue panel will show the percent received. Nothing will appear in the Data panel.
Requesting Missing Blocks/Header
If a transmission sequence has been completed and one or more stations have missing blocks or header information, the receiving operators may request the fill-ins using the Report button.
The Report button adds a text stream to the fldigi Tx buffer, but does not start the fldigi transmit processing. The recipient sends the Tx buffer using the T/R command when it is his or her turn to make the report. The report format in fldigi transmit panel will look like this:
DE S0MCAL File : Fox.txt
<MISSING 12 8793>{0EE2}1 2 3
DE S0MCAL K
In the event the header data is missing:
Missing file name (<FILE tag).
DE S0MCAL File : Unassigned
<MISSING 14 FB42>{0EE2}PREAMBLE
DE S0MCAL K
Missing file block count size or Station ID (<SIZE or <ID tags).
DE S0MCAL File : Fox.txt
<MISSING 14 FB42>{0EE2}PREAMBLE
DE S0MCAL K
If there were no missing data, a report of receipt confirmation will be sent. For our example it would be of the form:
DE S0MCAL File : Fox.txt
<MISSING 15 107D>{0EE2}CONFIRMED
DE S0MCAL K
The important word is "CONFIRMED." The "<MISSING" is the line descriptor. The "15" the length of the data block "{0EE2}CONFIRMED." The "107D" is the checksum associated with the data block, and the "0EE2" is the checksum of the file being processes (may be multiple files being reported). This is necessary to ensure that there are no false reports received.

Enable Tx on Report located in the Configuration panel allows the user to initiate transmit from FLAMP when mouse clicking on the "Report" button. When disabled transmit function must be initiated from Fldigi's T/R button.
Sending Missing Blocks/Header Information
For small files, another transmission of the complete file should suffice for fill-ins. In the case of a large file where only a few blocks are missing, flamp permits the sending station to just transmit the missing blocks.
When the sender has received all of the block missing reports he or she then retrieves the reports from fldigi by pressing the Fetch button. Flamp and fldigi communicate with each other using either fldigi's ARQ socket server or its xmlrpc socket server. These are two different processes with two different aims. The ARQ socket is used for sending and receiving the actual flamp messages. The xmlrpc socket is used for control processing, shared data exchange, and in this instance to read all of the fldigi Rx data received since the last retrieval.
Flamp parses all of the received data from one or more reporting stations. It combines them, discards duplicates and sorts the missing blocks numerically. It then updates the "blocks" entry control with the requested blocks. Missing header information assigns '1' to the missing block list, triggering a retransmission of the header information.
The combined set of missing blocks will appear as shown below along with total file size and transmission time.

Text Files
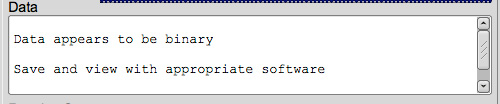
Flamp will send any file format. For example, ICS forms from Flmsg may be sent as well as spreadsheets in csv format or even binary files such as the Flamp.doc file as shown in the Transmit capture.
In the case of binary files, a message will be displayed upon receipt as shown below.
Transfer Receive Queue Item to the Transmit Queue.
- Select the receive queue item.
- Click on "To TxQ" button.
The content of the file, file name, description, and block size will be transfered to the TxQ after the user is requested to save the file. Software will only allow 100 percent completed files to be transfered. Mouse clicking on the Transmit tab reveals the transfered queue item. Retransmission of the file in it's complete form must be conducted (no missing blocks fills). The software is not designed to mimic a digipeater as the ID content and time stamp part of the file name will not be the same.
Event Scheduler
Timed Event Scheduler
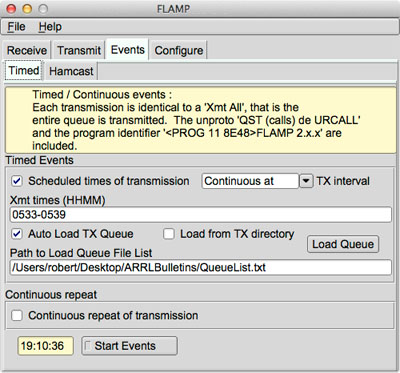
Flamp can transmit the queued files on a specified interval, on a timed schedule or continuously. This is configured via the Events tab.
This example below shows the transmission will be continuous between the hours of 05:33AM to 05:39AM UTC plus the time it takes to process the remaining buffered data within FLDIGI. Timing is initiated with the Start/Stop button at the bottom. The times do not have to be sequential.
Timed Events can be scheduled to occur on specified minute / hour values via the "Retransmit interval" combo as shown:
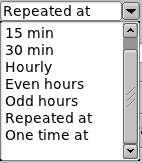
When executing the One time at event schedule, if there are multiple times in the Xmt time control, each event time will be removed from the Xmt time control as it is processed. When all times are exhausted the Start/Stop Events button is toggled.
When Repeated at is selected then the event times are as delineated in the Xmt times (HHMM) control block. Other options include various repeat intervals (5, 15, 30 minutes; hourly, even hours, odd hours) and one time repeat at a specified time.
Continuous at event transmits of the content of the transmit queue within a given window of time. Entering the start time followed by a hyphen and the end time (0100-0200, no spaces between numbers and the hyphen). The end time is the last time the queue will be sent to FLDIGI, not the end of transmit. Transmit will continue until the buffer has be processed.
Selecting Auto Load TX Queue on 'Continuous at' Event checkbox has two functions. First is to automatically load the transmit queue (at program execution) with the files listed in a load queue file. The path information to the queue file can either be dragged from a desktop icon into the 'Path to Load Queue File List' text input box or typed in by hand. The second is to load/reload the same files into to TX queue by replacement when a 'Continuous at' event occurs. Thus keeping the queue updated in the event these file have changed.
Pressing 'Load Queue' button with load the files listed in the queue list by replacement.
Continuous repeat works exactly as you would expect. The timer is based on 1-second intervals, which will result in a 1-second silent period between transmissions.
Note: Software will prevent the reloading of the Transmit queue via the Event panel if FLDIGI/FLAMP are in transmit mode. It's possible to miss a later event if the previous data is still being transmitted.
Event Time Format
HHMM<space>HHMM<space>,... or HHMM<comma>HHMM<comma>,...
Example:
1030 1230
or
1030,1230
When using 'Continuous at' Event
HHMM-HHMM<space>HHMM-HHMM<space>,... or HHMM-HHMM<comma>HHMM-HHMM<comma>,...
To the left of the hyphen is the start time, to the right is the end time. No spaces between the numbers and the hyphen.
Example:
1030-1230 1245-1300
or
1030-1230,1245-1300
File Format of Queue List
FLAMPTXQUEUE is a tag to identify the file as a FLAMP TX QUEUE list. The data within this file will not be processed if the tag is not present and must be the first item in the list. All entries must be followed by a carriage return. No blank lines between entries. The first blank line found will terminate the list reading.
Format:
FLAMPTXQUEUE
FileName.Ext<no spaces>,<no spaces>Compression(on[1]/off[0])<no spaces>,Description<cr>
,... (additional entries)

Example:

Cut and Paste then Modify (if needed)
---------------- Start - Dont include this line
FLAMPTXQUEUE<cr>
ARLB023.txt,1,ARRL Executive Committee to Consider Numerous Regulatory Issues<cr>
ARLB022.txt,0,FCC Dismisses "Encryption" Petition<cr>
---------------- End - Dont include this line
Note: The <cr> is the return key on your keyboard not to be included as
shown.
Note: The location of the queue file list must be in the same directory/folder as the files in the list.
Hamcast Multimode
The primary purpose for hamcast resided in the fact that a particular modem may function better under the conditions at the receiving end. Another reason might be that the receiving station software/hardware may not support all of the available modems that FLDIGI supports. Selecting various modems increases the possibility of a successfully reception by as many stations as possible.
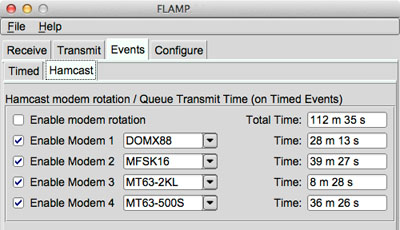
Hamcast activation facilitates the transmission of queued files using a rotating modems selected by the user. To illustrate this effect in the above panel. A 'Continuos at' is scheduled to occur between the hours of 0533 to 0539 hrs UTC. On the triggering of this event "Modem 1" (if enabled) will be selected and used to transmit the contents of the transmit queue. Once completed the second modem will then be selected to transmit the queue again. This cycling continues through all of the enabled modems until the event end is reached.
On multiple single events each enabled modem is assigned to each event.
Example:
If you have multiple entries in the Xmt times text field. Such as, 1000 1010 1035 1500 1510.
The following modems will be assigned and the queue content will be transmitted.
| Event time | Modem Used |
|---|---|
| 1000 | DOMX88 |
| 1010 | MFSK16 |
| 1035 | MT63-2KL |
| 1500 | MT63-500S |
| 1510 | DOMX88 |
The time information to the right of the modems indicates the amount of time each modem takes to transmit the entire transmit queue. Total time indicates the amount of time it takes to transmit the entire queue times the number of selected modems. This information might be useful in setting up the timed events in the Events Timed panel.
Times listed are the total transmit time for the selected modem only. Overall times are effected by interval timer, header modem, RSID, video text, carrier, and CW ID's generated by FLDIGI and/or FLAMP.
Note 1: Deselecting all modems automatically disables "Enable modem rotation". To Enable "Enable Modem rotation" one more "Enable modem n" must be selected first.
Note 2: Hamcast only operates from timed events. Manual transmission of the queue content defaults to the Transmit panel modem and/or selected header modem if enabled.
Note 3: Interval timer and header modem are available with hamcast operations.
Debug Log
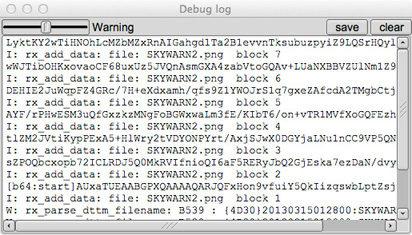
An Debug Log has been added to flamp for debugging purposes. It will capture events such as failed headers, data blocks etc. To access the Event Log, click Help – Events on the Flamp screen. The slider may be used to select 5 levels of event capture: Quiet, Error, Warning, Info (default) and Debug. The log may be saved. The saved log will be placed in the flamp folder.
Command Line ARQ/XML_IO Server/Port Switches User selectable ARQ/XML_IO Server/Port Command line switches. In the event the user requires a second or more paired FLDigi/FLAmp process for concurrent operation on another Transmitter/Receiver. User will need to assign a common server address/port number between each paired FLdigi/Flamp programs. It is recommend setting the PORT parameters only for each ARQ/XML_IO interprocess communication switch.
  --xmlrpc-server-address HOSTNAME
    Set the XML-RPC server address
    The default is: 127.0.0.1

  --xmlrpc-server-port PORT
    Set the XML-RPC server port
    The default is: 7362

  --arq-server-address HOSTNAME
    Set the ARQ TCP server address
    The default is: 127.0.0.1

  --arq-server-port PORT
    Set the ARQ TCP server port
    The default is: 7322
This bash script is an example to dedicate a FLDigi/FLAmp pair for VHF work. User will be required to set the Audio in/out ports in the FLDigi configuration panel to the radio designated for VHF work.
For OS' supporting the BASH command line program.
Cut and Paste then Modify (if needed)
---------------- Start - Dont include this line
#!/bin/bash

CMDS="-title VHF --arq-server-port 7323 --xmlrpc-server-port 7363"

fldigi $CMDS &
sleep 4
flamp $CMDS &

---------------- End - Dont include this line
Example
The text file used in the examples consists of 40 iterations of “The quick brown fox,...” as shown below:
 1. The quick brown fox jumps over the lazy dog
 2. The quick brown fox jumps over the lazy dog
    ,...
40. The quick brown fox jumps over the lazy dog
A copy of the Fldigi receive panel with the information entered as shown in the screen captures is below.
N0BDY DE S0MCAL
<PROG 18 E9CE>{0EE2}FLAMP x.x.x
<FILE 28 13C7>{0EE2}20130323070339:Fox.txt
<ID 41 EEBC>{0EE2}S0MCAL Tesla's Lab Colorado Springs
<SIZE 14 2F49>{0EE2}221 5 48
<DESC 15 856E>{0EE2}Lazy Dogs
<DATA 56 B927>{0EE2:1}[b64:start]AUxaTUEAAAggXQAAAAQAEAxB/TEWllgk3J5mK
<DATA 56 BAFA>{0EE2:2}pYEOyC+U2nmNwaGCVvFVmqBX/av7rhbtp4H4xoY39GsVdk5W
<DATA 56 24A2>{0EE2:3}ZmH3Jm/CULrcdlB39rhWJUUCcE0jXPg1l3yWPIV2q4fQDgaz
<DATA 56 87D0>{0EE2:4}FXD/IqYKt7x07GamZsVFZORzk/TLgX4vBXqTc86KGO7kCFhJ
<DATA 37 8435>{0EE2:5}Wpmo3mbURumL0Xj8cIE[b64:end]
<CNTL 10 8E8D>{0EE2:EOF}
<CNTL 10 2E81>{0EE2:EOT}
N0BDY DE S0MCAL K
Repeaters
The following guide lines should be employed to increase the likely hood of receiving data correctly over a repeater system.
When transmitting data over a repeater one has to contend with a few issues that are not present in simplex communications.
- Repeater timeouts and resets.
- Transmit delay.
- Over deviation
- Other issues not related to repeaters
- Setting RsID sensitivity level.
- Using RsID
- Multi path signals.
- Permission of the repeater owner
Permission from the owner and tone filtering
- The repeater may be for voice use only.
- The repeater might employ tone filtering to prevent DTMF and side tone from passing to the transmitter. Digital communications works better if this is turned off.
- Owner may only allow certain times for digital use.
- Above all, be respectful of the owners wishes.
Repeater timeouts and resets
From the FLAMP configuration panel.
- Enable Interval Timer.
- Select a receive duration suitable for the repeater in use. There is a minimal amount of time the repeater takes to reset for transmission to reoccur. Listen to the repeater while voice communications are occurring and do some time measurements. Add 1 or 2 additional seconds as a buffer.
- Select a transmit duration that does not exceed the repeater timeout period. Setting to one minute less is recommended due to the possible use of RSID, CWID, Video Text, and 'Pre-Signal Tone' overhead generated by FLDIGI.
Optional
Enable Header modem.
Transmit delay
From the FLDIGI configuration panel.
Menu: Configure(menu)->IDs(menu)->ID(tab)->RsID(tab).
Adjust the 'Pre-Signal Tone' to a duration long enough to over come the transmit delay of the repeater. You will have to experiment until the right value is known.
Not setting this correctly could cause the truncation of the beginning part of your transmission. Resulting in missed RSID's or data.
Setting RsID sensitivity level.
From the FLDIGI configuration panel.
Menu: Configure(menu)->IDs(menu)->ID(tab)->RsID(tab).
Set the RxID 'Sensitivity' slider above 'Pre-Signal Tone' to the left until the value of '2' is displayed. See Using RsID.
Using RsID
Fldigi's RsID decoder uses a probability model to allow detection of the RsID signal with varying degrees of sensitivity and false detections. The greater the sensitivity, the more probable that a code is decoded incorrectly.
Multi path signals.
Not a repeater issue but effects digital communications.
Since the repeater is at a fixed location, some of the multi-path issues can be negated by using a directed element (Yagi, Quad, etc) over a ground plane.
Over deviation
Repeaters are notoriously finicky about the deviation of you FM signal. Monitor your audio output level. See the owners manual for your radio on how to verify proper modulation level.