Table of Contents
Fldigi supports a full range of contests, either using it's internal logbook or when linked to one of the N3FJP loggers. Each contest's unique data exchange is captured either in a generic multi word exchange field, or in contest specific fields that are displayed in the main dialog logging group.

| Contest Type | State/Province QSO Party | Out of St/Pr/Area |
| Generic contest | Alabama QSO Party | ALQP |
| Africa All-Mode International | Arizona QSO Party | AZQP |
| ARRL Field Day | Arkansas QSO Party | ARQP |
| ARRL International DX (cw) | British Columbia QSO Party | BCQP |
| ARRL Jamboree on the Air | California QSO Party | CAQP |
| ARRL Kids Day | Colorado QSO Party | COQP |
| ARRL Rookie Roundup | Delaware QSO Party | DEQP |
| ARRL RTTY Roundup | Florida QSO Party | FLQP |
| ARRL School Club Roundup | Georgia QSO Party | GAQP |
| ARRL November Sweepstakes | Hawaii QSO Party | HIQP |
| Winter FD | Idaho QSO Party | IDQP |
| BARTG RTTY contest | Illinois QSO Party | ILQP |
| CQ WPX | Indiana QSO Party | INQP |
| CQ WW DX | Iowa QSO Party | IAQP |
| CQ WW DX RTTY | Kansas QSO Party | KSQP |
| Italian A.R.I. International DX | Kentucky QSO Party | KYQP |
| North American QSO Party | Louisiana QSO Party | LAQP |
| North American Sprint | Maine QSO Party | MEQP |
| Ten Ten | Maryland QSO Party | MDQP |
| VHF | Michigan QSO Party | MIQP |
| Minnesota QSO Party | MNQP | |
| Missouri QSO Party | MOQP | |
| Mississippi QSO Party | MSQP | |
| Montana QSO Party | MTQP | |
| Nebraska QSO Party | NEQP | |
| New Jersey QSO Party | NJQP | |
| New Mexico QSO Party | NMQP | |
| New York QSO Party | NYQP | |
| North Carolina QSO Party | NCQP | |
| North Dakota QSO Party | NDQP | |
| Ohio QSO Party | OHQP | |
| Oklahoma QSO Party | OKQP | |
| Ontario QSO Party | ONQP | |
| Pennsylvania QSO Party | PAQP | |
| South Carolina QSO Party | SCQP | |
| South Dakota QSO Party | SDQP | |
| Tennessee QSO Party | TNQP | |
| Texas QSO Party | TXQP | |
| Vermont QSO Party | VTQP | |
| Virginia QSO Party | VAQP | |
| Washington Salmon Run QSO Party | WAQP | |
| Wisconsin QSO Party | WIQP | |
| West Virginia QSO Party | WVQP | |
| 7QP QSO Party | 7QP | |
| New England QSO Party | NEQP |
Contesting with fldigi's built-in logbook
Select the contest type from the Contest combo:
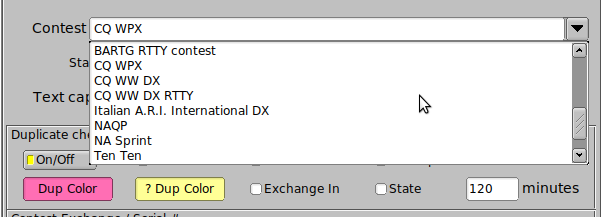
If you select the State QSO parties, you need to make a second selection for the specific state, province, area, or region contest in which you will be participating.

The serial number out (#Out) is automatically initialized and updated by the built-in serial number generator. You can enter the appropriate exchange information via the keyboard or mouse. Text in the Rx pane can be selected by mouse left-click / right-click. Make your selection and the info is placed in the correct text box. Note that the popup menu changes with the QSO logging view and also with a change in "Quick entry". A full description is found in the description of operating the Logbook. The important thing to note for contest operation is that the Call and Serial # are single word captures. The Xchg capture can be either single word or multiple word (mark / right click). If the Xchg field has text contents then the new capture is appended to end of the current text in that field. That means you can point to the word representing the field, right click and select from the menu. You do not need to highlight the text for the word capture. You can very rapidly fill in the serial number and the exchange data (even if multi value) by simply pointing and right clicking on the desired word.
Set up the Generic contesting on the UI/Contest tab. The Send Xchg control is the text you want the appropriate macro tag. ie...if the contest requires RST and name you would fill in the Exchange Out box with your name. The contents of this field are accessed from a macro with the <XOUT> tag. You will also need to check the RST always 599 box as this is the de-facto signal report in contests.
If you are participating in a CW contest you may want to select the "Send CW cut
numbers", cut numbers is the norm for a CW contest. The cut numbers will send N for 9 and T for zero.
The next box contains the needed requirements to use serial numbers for a contest. You will always want to use leading zeros, start with 1 and use 3 digits. Press reset to initialize the #Out QSO field to the Start number.
Check the appropriate fields for determining if this is a duplicate call. If a duplicate is detected the Call entry will be highlighted as shown in the "Dup Color" button. Pressing this button opens a color selector so you may customize the color. There are many choices to alert you to a duplicate contact. The duplicate is based on the logical AND of all of the fields to be checked. The DUPE is cleared when you press the clear QSO log button (the brush icon).
After you have filled in all the required information, make sure you save and close.
Remember YOU MUST click the Reset button in the Serial number panel for the serial number counter to be initialized. You should also press the QSO clear button (broom) in the QSO entry widget for the other changes to take effect.
It would be best to create a new log for each contest. You create a new log by selecting the menu item File/Logs/New logbook. The default new log name will be newlog.adif on Linux and newlog.adi on Windows. You can rename the new log file now or later by using the system file manager or when you save the log. The import/export feature of fldigi will allow you to export the log into your everyday logging software or the built-in fldigi logbook.
You can check for duplicates by any combination of the specified named fields. You can also specify that the duplicate had to occur within a given time interval. Some VHF contests allow a duplicate CALL after a given time interval.
Field Day Contest
The log fields and associated Rx Text popup menu changes to appropriate fields when the Field Day check box is enabled on the contest configuration tab:

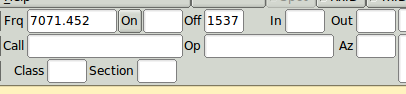
The field day station station callsign is your fldigi user callsign. Enter the operator's call (if different). Enter the Class and Section for your station. These will all be available as macro tags for writing macros appropriate for participating in the field day event.
fldigi can connect to external Field Day logging programs such as N3FJP's FDlog and/or a TclTk application called "fdserver" that is a part of the family of fldigi programs. fdserver operation is described in a separate document.
Additional instructions on the field day server is available at Field Day Server setup.
Capturing Rx data strings
Capturing exchange text from the Rx text panel has been simplified for contest operations. All text capture is based on a single mouse left click on the word of interest, or on the first word in a sequence:
- LEFT click - capture single word
- SHIFT LEFT click - capture two words
- CONTROL LEFT click - capture three words
- SHIFT CONTROL LEFT click - capture four words
The capture text parser behavior is keyed to the selected contest. The program will attempt to recognize specific phrases such as RST exhcange, States/Provinces (both long and abbreviations). For each contest there is a preferred capture order. The capture order for the specific contest is displayed on the contest configuration tab. Use the capture order to assist the parser.
You can also capture text using a RIGHT mouse click on the target Rx word. A pop-up menu will open with selectable fields that are keyed to the selected contest. You may need to use the right click paradigm when fields may be conflicting. For example a contest may require both RST and a SERIAL number, both of which may have similar values.
Contest Macros
It is recommended that you make a separate macro file for contesting. Start with the generic set of macros and modify them as described in this section. Then save the modified macros with a suitable file name such contest.mdf. This will give you 48 macros to use based on the type of contest you are entering.
Take a good look at the following examples and you will notice there are no commas, hyphens or other extraneous items. Your contest exchange should be brief and concise. These are examples of what not to do:
- w3nr you are 599 in Alabama your serial number is 001-001-001 how copy ??
- hello ed thanks for the call you are 599-599-001-001-001 QTH Alabama back to you
Capturing data from that kind of exchange is nearly impossible. Contest macros should be written to expedite the exchange of data.
When you enter a contest you have to decide whether you are going to sit on one frequency and call CQ (Run) or are you going to tune the band looking for stations to work (S&P). So lets set up some macros that should cover both cases.
Several new macro tags have been created to facilitate contesting, these include the following tags.
| <LOG> | add QSO data to the logbook & clear the QSO data fields |
| <CNTR> | insert current contest serial number into the text stream |
| <INCR> | increment contest serial number |
| <DECR> | decrement contest serial number |
| <XOUT> | contest exchange |
| <QSOTIME> | current log time in Zulu HHMM format |
| <LDT> | local date time |
| <ILDT> | LDT in iso-8601 format |
| <ZDT> | Zulu date time |
| <IZDT> | ZDT in iso-8601 format |
| <QSOTIME> | actual time of execution of the macro ... useful where exact times are used to match contest log submissions |
| <SAVEXCHG> | save entire contents of the expanded macro text to the "Exchange Out" field in the logbook |
| <XBEG> | mark the beginning of a text string that is to be saved to the "Exchange Out" field in the logbook |
| <XEND> | mark the end of the text string that is to be saved to the "Exchange Out" field in the logbook <XBEG>...<XEND> is given priority if both all three are specified in a single macro |
See Macros for additional information on editing and using the fldigi macro system.
RUN Macros
We need just a few, starting with a CQ macro - Put this in the F1 key definition
<TX>
cq test de <MYCALL>  <MYCALL>   cq k
<RX>
Notice that I left 2 spaces between my call and 3 spaces at the end before the k. This will make it easier for a station to grab my call and the k on the end eliminates garbage characters before my macro finishes. The tx/rx are on separate lines as I want to be sure my macro is on a line by itself and not mixed in with screen garbage. This does not apply to the CW mode as there is no CR/LF function in CW. fldigi will convert the CR/LF to a space in the CW mode.
Now the exchange macro - Put this in the F2 key definition
<TX>
<CALL> 599  <CNTR> <CNTR>  <XOUT>  <XOUT> <CALL>  k
<RX>
Why do I have his call at the beginning as well as the end, to make sure I have copied his call correctly. You will also see that I have not as yet logged the contact,why, well are you sure he does not need to correct his call or ask for a repeat.
You are asked to repeat the exchange, you can just re-send the exchange macro, this verifies all of the information. Now he sends you his info and if you have copied it correctly you need a TU macro. - Put this in the F3 key definition.
<TX>
qsl tu qrz test  <MYCALL>  k
<RX><LOG><INCR>
Here we have done all the necessary items to complete the exchange. Notice that I did not log the contact until after everything was correct. I have fldigi set to clear on save, so when the <LOG> part of the macro executes the QSO area is cleared.
Thats the end of my RUN macro setup, told you it was rather simplistic and generic.
S & P Macros
I rarely if ever use S&P, but there are times I need to, especially if my QSO rate drops while running. Again the macros are very generic with only the needed info. If band conditions warrant you may want to send your call 3 times. Put this in the F5 key definition
<TX>
<MYCALL>  <MYCALL>  k
<RX>
Why just my call ?? Well I assume the other guy already knows his call !
The exchange macro is basically the same as the RUN macro. Put this one in the F6 key definition
<TX>
599  <CNTR>  <CNTR>  <XOUT>  <XOUT>    k
<RX>
As you see I have not as yet logged the QSO or incremented the serial number. This is the final S&P macro. Put this one in the F7 key definition.
<LOG><INCR>
Now this is the most important macro you will ever need......trust me. Put it where you won't fail to find it. How about F9 ?
<TX>
agn  agn  k
<RX>
You will see that it is used many times during a contest, especially with weak stations and heavy QRN/QRM.
-
<QSOTIME> - time sent in Tx stream
- repeat execution of <QSOTIME> before a <LOG> macro or a save to log button press will resend the original time
- <LOG> macro or a save-to-log button press appends the QSOTIME to the STX_STRING field in the adif log record and clears the QSOTIME.
-
<XBEG> - use at end of a contest exchange to save the entire exchange string in STX_STRING
-
usurps QSOTIME if both are contained in same macro text, ie:
"<RST> <CNTR> <QSOTIME> <SAVEXCHG>" will send the exchange as
599 024 1125
if RST = 599, Counter = 024 and time of execution is 1125 - repeats the same as <QSOTIME >
-
usurps QSOTIME if both are contained in same macro text, ie:
-
<LOG> - or a save-to-log button press saves the associated macro text (after expansion).
- QSOTIME and the saved exchange text are cleared after the save occurs.
An example of the SAVEXCHG macro tag
<RST> <CNTR> <XOUT> <QSOTIME><SAVEXCHG>
Where RST = 599, CNTR = 0125, XOUT = AL, QSOTIME = 1433
Will save this string to the Exchange Out field in the logbook: "599 0125 AL 1433"
Please note that you should not include any text or macro tags that are not to be a part of Exchange Out. If your macro had this:
<TX><CALL> UR <RST> <CNTR> <XOUT> <QSOTIME> de <MYCALL> k<RX><SAVEXCHG>
Where CALL = W3NR, MYCALL = W1HKJ
the saved Exchange Out field would contain: "W3NR UR 599 0125 AL 1433 de W1HKJ k"
Probably not what you want. Use separate function keys for the "<TX>CALL ..." and the "de <MYCALL> k<RX>" or use the next set of macro tags
<XBEG>...<XEND>
These two macro tags are delimiters for capturing the transmitted exchange data, for example:
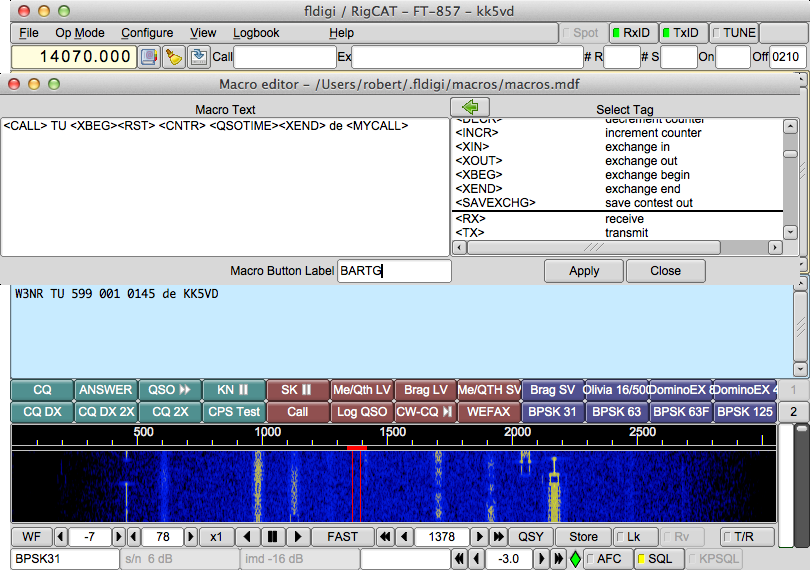
<TX><CALL> de <MYCALL> QSL <XBEG><RST> <CNTR> <QSOTIME><XEND> K<RX>
Will place the expanded <RST> <CNTR> <QSOTIME> into the Exchange Out field of the logbook when the contact is saved. This is much better illustrated with a screen shot. This one shows the macro editor contents, the logbook entry in Exchange Out, and the transmit text buffer.
Contesting with N3FJP logger connection
Fldigi and the N3FJP logging software have been interfaced to form a very powerful combination that allows the avid contester to perform CW and digital communications in the most popular ARRL, National, International, and State contests. This combination also assists the Handi-ham in communicating in CW. They allow the operator to send and receive contest exchanges as well as control their rig. The N3FJP logger behaves as a log data base server and fldigi the modem client for the purposes of data exchange. The N3FJP logger can reside either on the same host computer (Windows) or on a LAN connected Windows host computer. The fldigi/N3FJP combination has been tested on a single Windows 7/8/10 computer, and on a LAN with fldigi running on a second Windows computer, a Linux computer, and an Apple OS-X computer.
Although the contests are varied, certain parts of the setup are the same for all. These include the Sound Card (Rig Interface such as Rig Blaster, Signalink, or home brew) and the API (Application Program Interface), and transceiver control. Either fldigi or the N3FJP program can provide transceiver control, but use of the fldigi / flrig combination for transceiver control is recommended as it can provide a broader range of control functions.
The N3FJP logger will maintain and provide the SENT serial number to fldigi. That serial number will be used in all macros which reference the sent serial number.
The N3FJP logger software is independently sold and distributed by Scott and Kimberly Davis. Download the appropriate logging software from the "Contest Logs" menu at http://www.n3fjp.com.
Either fldigi or the N3FJP logger can be started first. When so configured fldigi will periodically attempt to connect to the logger. The two programs can reside on a single or multiple computers with LAN access. The N3FJP logger will only run on a Microsoft Windows operating system; fldigi can be running on any of its supported operating systems. The connection has been tested between Linux, OS X, and Windows operating systems.
N3FJP Logging Application Setup
These actions are taken within the N3FJP Program.
- Start the N3FJP progam
-
Configure your station information
- Click on Settings->Setup...
-
Enable the API Server
-
Click on Settings->Application Programming Interface (API) to configure and enable its server.
This is necessary even if both fldigi and the logger are on the same machine. - Check the TCP API Enabled (Server) checkbox in the upper section for API port 1100 and click the Done button.
-
Click on Settings->Application Programming Interface (API) to configure and enable its server.
-
Optional - If you want to use N3FJP for rig control
-
Other rig control options are more powerful, but the fldigi/N3FJP combination can provide limited rig control from fldigi. Perform the following steps before enabling the fldigi-N3FJP server connection described in the next subsection
-
Enable N3FJP rig control
- Click on Settings->Rig Interface ...
- Select a basic rig configuration file as a starting point
- Select the COM port to use
- Modify parameters as necessary for your specific rig
- Set Mode Determined By to Don't Use and set your rig to an appropriate mode for fldigi use
- Click on the Test button and verify you have successful rig polling
- Do NOT click on the End Test button since that will disable control
- Click the Done button to exit the window
-
Enable N3FJP rig control
- After performing the Fldigi Setup in the next section, fldigi will receive an indication from the N3FJP application that it has rig control and fldigi will adjust its messaging accordingly.
-
Control capabilities from fldigi in this configuration:
- Set frequency via the Frequency Control
- Transmit
-
Other rig control options are more powerful, but the fldigi/N3FJP combination can provide limited rig control from fldigi. Perform the following steps before enabling the fldigi-N3FJP server connection described in the next subsection
NOTE 1: If you change the N3FJP program's role from controlling to non-controlling or vice versa, you MUST disable and re-enable the fldigi connection from its Logging/N3FJP logs configuration page in order for fldigi to be aware of the change.
NOTE 2: N3FJP programs will continue to report that they are in control as long as a rig other than "None" is highlighted in the Select Rig column. Be sure to select "None" on that page and click the "Done" button when you are done using the N3FJP program for control.
Fldigi setup
-
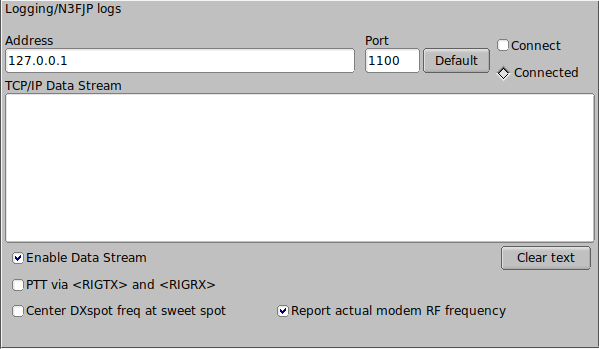
Open the fldigi configuration dialog to the Logging/N3FJP logs tab
 N3FJP connect
 -
Enter the LAN address using either the machine name or IP address; e.g., LENOVO-DUALBOOT or 192.168.1.81.
If both fldigi and the N3FJP logger are on the same Windows computer, then the machine address is 127.0.0.1. - Check the "Enable Data Stream" box to view the connect and data transfer process in the TCP/IP Data Stream window.
- Check the "Connect" box.
fldigi should connect to the logger within a few seconds and will briefly display a popup dialog to that effect. The "Connected" diamond indicator should turn GREEN and if you enabled the data stream viewing you will see the messages exchanged in the TCP/IP Data Stream window.
Disconnecting is as simple as unchecking the "Connect" box.
Two additional options are available with respect to data exchange between fldigi and the N3FJP logging program:
-
Center DXspot freq at sweet spot
- When using the N3FJP DX spotting capability, clicking on a spot sends the frequency to fldigi; with this box checked, fldigi will adjust its settings so that the signal falls on the default or user-defined sweet spot relative to the transceiver's receive and transmit filter bandwidths.
-
Report actual modem RF frequency
- The user can opt to report either fldigi's carrier frequency (from the Frequency Control) or the actual modem frequency (carrier + center of audio modulation) for logging purposes; rig control is always in terms of carrier frequency.
There is an additional control option applicable only if you plan to use an N3FJP program for rig control:
-
PTT via <RIGTX> and <RIGRX>
- By default, N3FJP programs use <CWCOMPORTKEYDOWN> ... <CWCOMPORTKEYUP> to key the transmitter (equivalent to DTR). You can change this to use <RIGTX> ... <RIGRX> (i.e., PTT using your rig's software command) by clicking the checkbox.
fldigi's contest selectors will be set by the initial information exchange with the N3FJP logger. Exiting the N3FJP logger and starting a different one will be reflected in fldigi's contest configuration almost immediately. The fldigi main dialog title bar and the fldigi logging controls will reflect the change in contest usage. Here is an example for an automatic connection to the CQ WW DX contest:

fldigi will query the N3FJP logger for duplicate checks. Both the N3FJP logger and the fldigi logging control for CALL should provide a duplicate indication.
For more information on fldigi/N3FJP loggers see N3FJP Log Operations.