Table of Contents
If you own a WinKeyer, WinKeyer USB, or compatible keying interface then you may use that device with fldigi to key your transceiver.
The transceiver must be in either CW or CW-reverse mode for the WinKeyer to correctly key the transceiver. If you are using rig control, then the waterfall will correctly show the received CW in relation to the suppressed carrier insertion point. The waterfall scale will decrease from left to right if the transceiver operates CW as LSB and increase from left to right if the transceiver CW operates as USB (usually CW and CW-REV as on my IC-7200).
The transceiver will either have a fixed or adjustable CW received pitch. On the IC-7200 this is a menu item named CW-PITCH. I prefer listening to a 700 Hertz CW signal and set my transceiver accordingly. You must also set the fldigi CW sweetspot to the same value to insure that QSY, DXcluster spotting and other RF/AF functions to operate correctly in fldigi.
Open the configuration dialog and click on the CW/WinKeyer item in the tree menu.
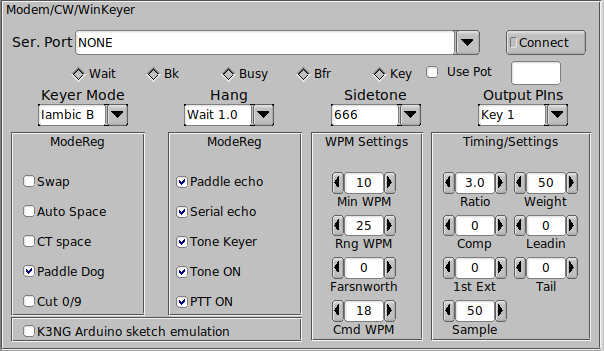
Select the serial port to which the WinKeyer is attached. On a recent Linux distribution that will shown in both traditional device and named device.


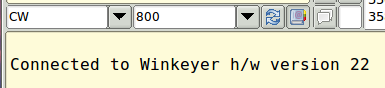
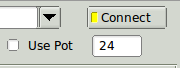
Then press the "Connect" button. fldigi will attempt to connect and test the connection to the WinKeyer hardware. Upon success the "Connect" button will illuminate Yellow and the connection state will be annunciated to the Rx panel.
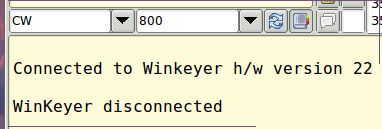
Pressing the "Connect" button when it is illuminated with cause fldigi to disconnect from the WinKeyer hardware and a successful disconnect will be annunciated to the Rx panel.
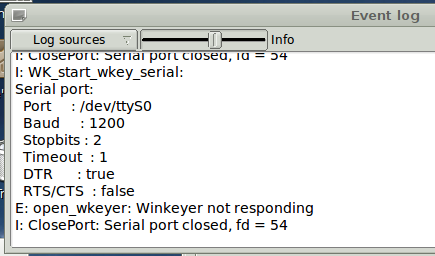
If the connection attempt fails the "Connect" button will fail to illuminate and a failure notice will be printed to the event log.
Configuration Items
The fldigi configuration interface for the WinKeyer is similar to the one available in the application flwkey. It will probably not exactly match any Windows application you may have received with the WinKeyer kit.
You may elect to use the speed potentiometer on the WinKeyer hardware. Check the "Use Pot" control and changes to the WinKeyer speed will be annunciated to both the configuration tab and the fldigi main dialog.
If you do not use the potentiometer, then fldigi will use it's internal controls which are described in the CW modem and CW modem configuration.
Keyer Mode
WinKey supports Iambic A, B, Ultimatic, and Bug keying modes. In iambic mode WinKey makes both dits and dahs automatically based on which paddle you press. In bug mode WinKey makes the dits and you make the dahs. You also can use bug mode to operate in straight key mode or if you want to key through WinKey with a different keyer, simply set bug mode and use the dah input to key WinKey. In either iambic mode, alternating dits and dahs are sent while both paddles are held closed. In mode B an extra alternate dit or dah is sent after both paddles are released. In Ultimatic mode when both paddles are pressed the keyer will send a continuous stream of whichever paddle was last pressed.
Sidetone
You can adjust the audible keying tone that the WinKeyer produces using the Sidetone selector. Turn the audio on and off using the "Tone ON" control
Hang time
Hang Time works by holding PTT on between paddle presses. The holding time is call "hang time" and is measured in word space time.
- Wait 1.0 wordspace before ending paddle insertion
- Wait 1.33 wordspace before ending paddle insertion
- Wait 1.66 wordspace before ending paddle insertion
- Wait 2.0 wordspace before ending paddle insertion
Output Pins
The keyline can be connected and controlled from eithe "Key 1", "Key 2", or both simultaneously. Select the one that is appropriate for your installation.
Mode Register Controls
WinKeyer maps various internal controls to a "mode register" in which the state of the control is either on or off. These are mapped to the fldigi "ModeReg" controls:
-
Swap
This is a nice feature to have when right and left handed ops want to share the same keyer. Enable to reverse the sense of the left and right paddles. -
Auto Space
Here is how autospace works: If you pause for more than one dit time between a dit or dah WinKey will interpret this as a letter-space and will not send the next dit or dah until full letter-space time has been met. The normal letter-space is 3 dit spaces. WinKey has a paddle event memory so that you can enter dits or dahs during the inter-letter space and WinKey will send them as they were entered. With a little practice, autospace will help you to send near perfect Morse. This only applies CW sent using the paddles connected to the WinKeyer. -
CT space
Winkey supports contest spacing which reduces the wordspace time by one dit. Instead of 7 dits per wordspace, Contest spacing selects six dits per wordspace. -
Paddle Dog
Winkey has a paddle watchdog counter that will disable the key output after 128 consecutive dits or dahs. This is to guard against the paddles being accidentally keyed continuously. By default the paddle watchdog is on but it can be turned off by disabling this control. -
Cut 0/9
Enable to force WinKeyer to send a T for 0 and N for 9. Often used in contests to shorten transmissions such as 599 to 5NN. -
Paddle echo
When this control is set characters entered on the paddles will be echoed back to the host. From the host perspective paddle echo and serial echo are the same, in either case the letter sent in Morse by WinKey is echoed back to the host. The echo occurs after the letter has been completely sent. This feature is not currently used by the fldigi / WinKeyer implementation. -
Serial echo
Always enabled. -
Tone Keyer
Normally WinKeyer uses PTT output. Sacrificing PTT functionality, the WinKeyer can be configured to output a square wave sidetone instead by using enabling the "Tone Keyer". -
Tone ON
Enable the audible keying tone emanated by the WinKeyer hardware. -
PTT ON
Enable the PTT lines. Normally enabled, but you might want to disable if you are simply practicing CW and do not want to key the transmitter.
WPM Settings
These controls allow the user to set up various internal WinKeyer variables.
-
Min WPM
Sets the WPM for the minimum WinKeyer poteniometer position -
Rng WPM
Sets the WPM range for the WinKeyer potentiometer -
Farnsworth
Farnsworth spacing is useful for CW practice because it encourages you to learn characters by sound not individual dits and dahs. In WinKeyer, Farnsworth is implemented by sending letters at a fixed rate of nn WPM regardless what the WPM sending rate is. Spacing between characters is determined by the sending rate. When the WPM rate is set above the Farnsworth WPM, Farnsworth is automatically disabled. -
Cmd WPM
Sets the WPM used for sending commands to the WinKeyer using the paddles.
Timing Settings
These control various aspects of the WinKeyer keyline output.
-
Ratio
Allows WinKey to deviate from the standard 1:3 ratio of dit/dah. -
Weight
This control allows a proportional amount to be either added or subtracted from the length of all dits and dahs sent. Note that weighting does not affect sending speed because any increase in keyed time is subtracted from spacing time. Reduction in weighting results in a thinner sounding keying while increased weighting results in a heavier sound. Since weighting tracks speed, a given weighting will sound the same at all speeds. -
Comp
Keying Compensation allows a fixed amount of time in milliseconds to be added to the length of all dits and dahs.
QSK keying on modern transceivers can cause shortening of the dit and dah elements which is especially noticeable at high speeds. WinKeyer allows the length of the dit and dah elements to be increased uniformly to compensate for this. The adjustments are made in units of one-millisecond steps. The maximum adjustment is 250 mSecs.
Key compensation is very similar to Weighting in that any adjustment added to the dits and dahs is subtracted from the spacing so the speed is not changed. The difference between weighting and compensation is that compensation is independent of speed, so if 10 msec of key compensation is selected 10 msec will be always be added regardless of speed. So be careful at high speeds and large values of key compensation, you may end up with no inter-element space.
-
Lead-in, Tail
WinKeyer provides a transmitter PTT output that can be used to switch a transmitter or linear amplifier over to transmit mode in advance of actual CW keying. You have control over the time delay between when PTT is asserted and when CW keying will start, this is lead-in. You also have control over how long the transmitter will stay in transmit after keying has stopped; this is the tail delay. -
1st Ext
WinKey addresses a problem often encountered when keying older transceivers that have a slow break-in response. Due to a slow receive to transmit changeover time, the first dit or dah of a letter sequence can be chopped and reduced in length. Adding a fixed amount to the first element of a sequence can compensate for this.
For example, an R would be sent with the first dit elongated but the subsequent dah-dit sent normally. The compensation amount is transceiver dependent and is generally independent of sending speed. Note though that this is usually only a noticeable problem at higher CW speeds >25 WPM.
A challenge in this scheme is to determine when sending has stopped long enough to cause the transceiver to switch back to receive. If it has it’ll require a new first element correction on the next sequence. WinKeyer uses the PTT tail timer to determine this, set the tail timer to roughly match the transmit to receive changeover time of the transceiver and things will work fine. It takes some trial and error to get it set up right so make sure you preserve the value and load it as a defaults after reset.
-
Sample
Sets the number of samples per second that WinKeyer uses to read the WPM potentiometer and the paddle states.
Dx Cluster QSY with Winkeyer
Set the fldigi configuration item for CW sweetspot to be the same as the transceiver's CW PITCH setting. On older transceivers this might be the same as the beat frequency oscillator, BFO, setting. The following should work correctly whether controlling the transceiver using hamlib, rigcat, or flrig.
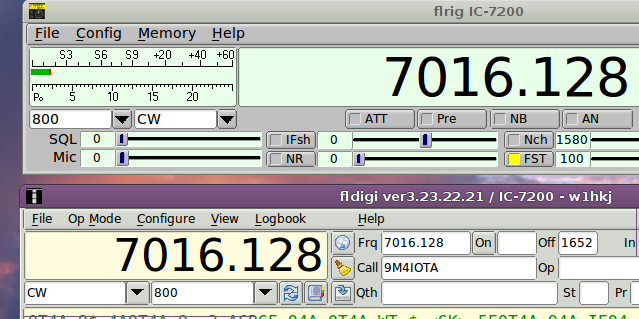
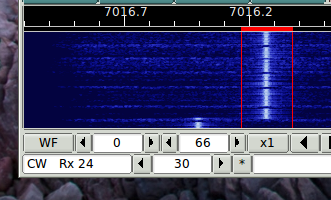
Select a dx station to track by clicking on the dx report line (see DX Cluster). If the dx station was reported as operating at 7.0164 MHz but is actually at 7.0128 MHz; then the flrig and fldigi controls will look like this if the transceiver's CW is an LSB mode:
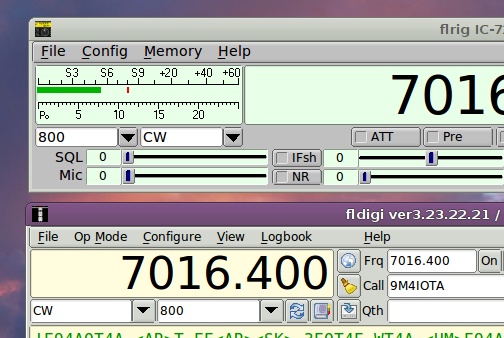
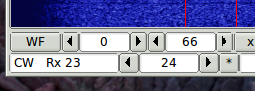
and the waterfall will appear as
Center the waterfall tracking point over the actual signal and then press the fldigi QSY button. The waterfall will change to
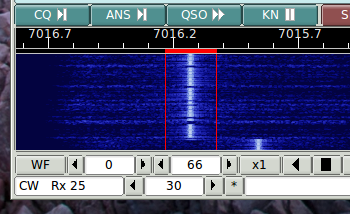
and fldigi and flrig frequency controls move accordingly.